-
Keep cables & earpieces away from aftershave, perfumes, hair sprays, and other grooming products which contain chemicals harmful to earpiece components
-
Avoid leaving earpiece in direct sunlight for extended periods of time
-
Do not wash cables, mics, or plugs
-
Earbuds & foams can be cleaned with warm, soapy water or washed in a net bag or knotted sock in a washing machine. All other parts can be cleaned with warm, soapy water
-
If you suspect that water has found its way into the electronics, remove power/batteries immediately and leave to gently dry in a warm place for at least 24 hours
Common Failures Associated With Acoustic Tube Earpieces
The most common acoustic tube earpiece failures are:
- Earpiece becoming blocked with earwax or moisture
- Cable partially unplugged from transducer
- Cable failure
- Transducer failure
How to Clean your Acoustic Tube Earpiece
The acoustic tube is one of the most popular earpieces and takes a special degree of care to maintain due to its technical complexity. Below we've compiled some common issues with acoustic tubes with solutions, followed by an instructional guide on properly cleaning it:
-
"I can't hear anything through my acoustic tube earphone......is it broken?"
First, determine if the acoustic tube is the source of the problem by disconnecting the earphone and testing if you can hear incoming calls from the speaker. Remove the acoustic tube from the clothing clip assembly by rotating the twist connector. Make sure the audio accessory is properly connected to your two-way radio, and that the radio is turned on and the volume turned up. Put your ear near the clothing clip assembly while your radio is receiving an incoming transmission. If you can hear the transmission, then the sound pressure through your acoustic tube is being blocked by a kink, bend, debris, or hole in the tube. Clean if you observe debris in the tube, or replace if the tube is structurally damaged.
-
"The volume on my acoustic tube is much lower than when I first bought it"
The likely cause of this problem would be damage or blockages in the acoustic tube. Over time, the tube can become blocked with moisture, dirt, earwax, or sweat. Remove the acoustic tube from the clothing clip assembly by rotating the twist connector, then inspect the tube for damage/debris. If the tube appears damaged, you'll need a replacement. If the tube appears blocked or looks dirty (might turn yellow-brown), then clean the tube using the procedure below.
-
"My acoustic tube appears to have an air bubble, or tube material is distorted. Can I fix it?"
If the acoustic tube appears to have an air bubble inside of the tube, it may just have moisture or condensation trapped inside. Follow the cleaning instructions below to clear the tube. If cleaning fails to fix the issue, the tube material may be damaged or warped, requiring a replacement.
Instructions For Cleaning Acoustic Tube
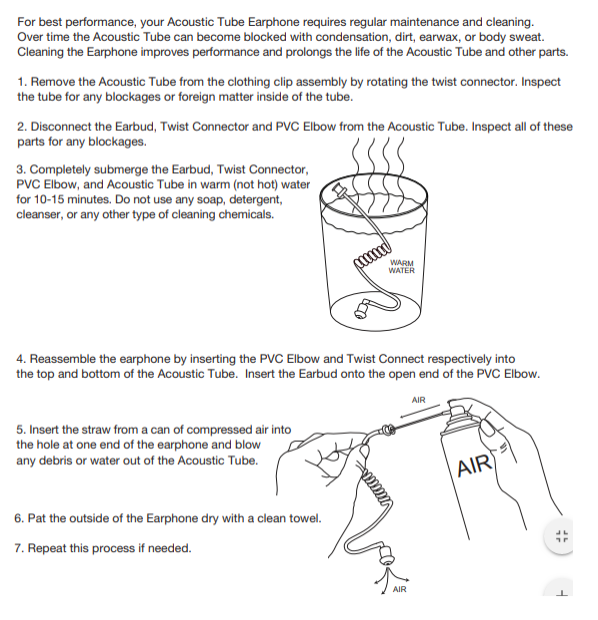
- Remove the clear acoustic tube from the clothing clip assembly by rotating the twist connector. Inspect the tube for any blockages or foreign matter inside the tube.
- Disconnect the earbud, twist connector, and PVC elbow from the acoustic tube. Inspect all these for any blockages
- Submerge the earbud, twist connector, PVC elbow, and acoustic tube in warm (not hot) water for 10-15 minutes. Do not use any soap, detergent, cleanser, or any other cleaning chemicals.
- Reassemble the earphone by inserting the PVC elbow and twist connector respectively into the top and bottom of the acoustic tube. Insert the earbud onto the open end of the PVC elbow.
- Insert the straw from a compressed air can into the hole at one end of the earphone and blow any debris or water out of the acoustic tube.
- Pat the outside of the earphone dry with a clean towel
- Repeat the process if needed.
If the above steps failed to solve your problem, then you may need to purchase a replacement acoustic tube.
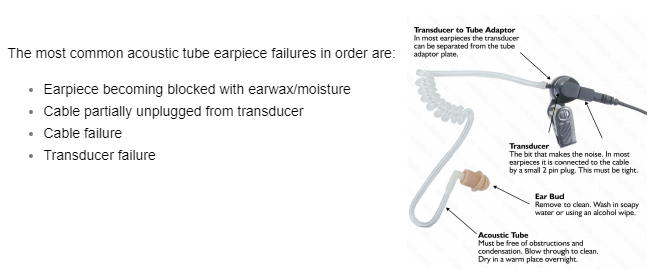
The most common acoustic tube earpiece failures in order are:
-
Earpiece becoming blocked with earwax/moisture
-
Cable partially unplugged from the transducer
-
Cable failure
-
Transducer failure